Atria System Prerequisites
Overview
This guide outlines the essential prerequisites for installing Atria, including system requirements, network configurations, and recommended components. Proper preparation ensures a successful deployment and smooth operation of the Atria platform. Follow these guidelines to configure your environment, set up key infrastructure components, and secure necessary permissions before installation.
Server Roles & Requirements
For a base installation of Atria, the following servers will need to be provisioned in your environment:
-
Provisioning Server - hosts core services like Atria Config Service, Directory Web Service, Provisioning Engine, RabbitMQ, and Platform API. It acts as the main coordinator for provisioning tasks, connecting the Web Server and the Database Server.
-
Database Server - manages the Atria SQL database and reporting functions, storing configuration data, logs, and provisioning records. It supports all service components that require persistent data storage.
-
Web Server - provides the user interface and API endpoints for interacting with the platform. It processes incoming HTTP/HTTPS requests from users and administrators while facilitating secure communication with the Provisioning Server.
Please ensure these servers meet the recommended specifications outlined below:
Recommended Specifications
| # of Server | Server | vCPUs | RAM | Core Component Services |
|---|---|---|---|---|
| 1 | Provisioning Server | 4 | 8 GB | Atria Config Service, Directory Web Service, Provisioning Engine, RabbitMQ, Agent, Platform API |
| 1 | Database Server | 4 | 8 GB | Atria Database, Atria Reporting |
| 1 | Web Server | 4 | 8 GB | Atria Web |
While Windows Server 2022 is recommended for optimal performance and feature support, Windows Server 2019 or earlier is still supported with the following considerations:
- Feature Limitations: Certain features, such as advanced security options, Windows Admin Center integration, and enhanced virtual machine support, are limited in Windows Server 2019.
- Manual Configurations: Older Windows Server versions may require manual installation of services like .NET Framework 4.8 and updated PowerShell modules.
- Compatibility Notes: Ensure compatibility with third-party software versions, including SQL Server, Exchange, and Active Directory services.
We are currently in the process of testing Atria with Windows Server 2025. It is not officially supported as of now.
Software Requirements
Each server should be joined to your Active Directory domain.
For each server that will have core components or web services installed, the below prerequisite items must be installed. By default, this includes the provisioning server and web server:
PowerShell 5.1
If you are running Windows Server 2022 or later, this is installed by default.
.NET Framework 4.8
Please check if Powershell and .NET server versions are both supported by your services (i.e. Exchange, Virtual Apps & Desktops, etc.) If not, then the latest CU or software version of your services needs to be implemented.
DNS
- A Records
- CNAME Records
Add **Host (A) **DNS Records below to be set to the Provisioning Server IP address
- AtriaConfigService
- AtriaHTTPTunnel
- AtriaPlatformAPI
Add CNAME DNS records
- AtriaSQL (Alias for the SQL Server)
- AtriaWeb (Alias for the Web Server)
Windows Domain Administrator Account
Ensure you have a Domain Administrator account ready as it is required to run the entire Atria deployment process.
Active Directory Schema Extension
For Atria to function correctly, the Active Directory schema must be extended to include the standard Exchange attributes. This is required to prepare the environment for multi-tenancy and is mandatory even if you do not intend to deploy Exchange.
To extend the Active Directory Schema, follow this guide: Extend Active Directory Schema with Exchange Attributes.
The guide will have you download the Microsoft Exchange Installation Media and run the following commands from a Windows Command Prompt:
> <Virtual DVD drive letter>:\Setup.exe /IAcceptExchangeServerLicenseTerms_DiagnosticDataOFF /PrepareSchema
> <Virtual DVD drive letter>:\Setup.exe /IAcceptExchangeServerLicenseTerms_DiagnosticDataOFF /PrepareAD /OrganizationName:”Your Organization”
Further Information
Extending the Active Directory schema ensures that essential attributes required for multi-tenancy and service integration, such as those used by Exchange, are available within the directory. This process allows the platform to function properly by enabling key features like user provisioning, email service configuration, and attribute synchronization. Skipping this step can cause critical failures in user provisioning, incomplete attribute assignments, and service integration issues.
Database Server Preperation
The minimum supported version of Microsoft SQL Server is 2016. Make sure to install SQL Tools such as SQL Management Studio and SQL Profiler.
In addition, your database server should be prepared by configuring the following:
Configure for Mixed Mode Authentication
- Open SQL Server Management Studio (SSMS).
- Right-click the server instance and select Properties.
- Navigate to the Security page.
- Under Server Authentication, select SQL Server and Windows Authentication Mode.
- Click OK, then restart the SQL Server service.
SQL Configuration for TCP/IP properties
- Open SQL Server Configuration Manager.
- Expand SQL Server Network Configuration.
- Select Protocols for [Your Server Instance].
- Right-click TCP/IP and choose Enable.
- Double-click TCP/IP, navigate to the IP Addresses tab, and ensure the appropriate IP addresses are enabled.
- Restart the SQL Server service.
Grant a Windows-authenticated user access to SQL Server Instance
Step 1: Open SQL Server Management Studio (SSMS)
- Launch SQL Server Management Studio (SSMS).
- Connect to the SQL Server instance using a domain administrator.
Step 2: Add the User as a Login
- In Object Explorer, expand the Security node.
- Right-click Logins and select New Login.
- In the Login - New window:
- Select Windows authentication.
- Click Search and enter the user’s Windows account (e.g., DOMAIN\Username).
- Click Check Names to verify the account.
- Click OK.
Step 3: Grant Database Access
- Expand Databases and locate the target database.
- Expand Security > Users.
- Right-click Users and select New User.
- In the Database User - New window:
- Enter the same Windows username.
- Choose db_owner, db_datareader, db_datawriter, or other roles as needed.
- Click OK.
Credential & Token Storage (Optional)
Atria requires access to privileged credentials, tokens, and secrets in order to perform provisioning tasks and integrate with connected systems. These are securely stored using encryption within the Atria system. By default, encrypted data is stored in the SQL database.
If you prefer to use Azure Key Vault for secret storage, a Key Vault must be available at the time of installation, along with an account that has full access to it. Additionally, you’ll need the ability to create Azure applications during the Atria Platform setup.
Both the Key Vault and the required application can be created in advance to streamline the installation process.
Firewall & Network Architecture
Network Architecture Diagram
This diagram has been created to illustrate the communication flow between core components, including the Provisioning Server, Database Server, and Web Server.

Each connection is labeled with its corresponding TCP port and protocol for clarity.
- Solid Lines: Mandatory connections required for core services.
- Arrows: Indicate data flow direction between components.
- Dashed Lines: Indicate separate environments.
Firewall Requirements
The following outlines the required network protocols, ports, and their purposes for communication between Atria components. Ensure that all of these communications are possible before proceeding.
- Provisioning Server
- Web Server
Inbound
| Protocol | Port | Purpose |
|---|---|---|
| TCP | 5671, 5672 | RabbitMQ communication (HTTPS and HTTPS). |
| TCP | 15671, 15672 | RabbitMQ management communication (HTTP and HTTPS). |
Outbound
| Protocol | Port | Purpose |
|---|---|---|
| TCP | 1433 | Default SQL Server communication (use custom port if specified). |
| TCP | 8095 | Communication with services like Exchange and SharePoint. |
| TCP | 25 | Email delivery for system-generated emails. |
Inbound
| Protocol | Port | Purpose |
|---|---|---|
| TCP | 443 | HTTPS/API communication including Active Directory sync. |
Outbound
| Protocol | Port | Purpose |
|---|---|---|
| TCP | 8095 | Core/config/service communication between Web and services. |
| TCP | 8098 | Extended API communication. |
| TCP | 8100 | Task execution services. |
| TCP | 8101 | HTTP Tunnel access for Remote Environments. |
| TCP | 1433 | Default SQL Server communication (use custom port if specified). |
If planning to setup AtriaWeb in a de-militarized network zone (DMZ), make sure that the firewall rules allow (HTTP/HTTPS). The installer will need to communicate with the AtriaConfigService to retrieve encryption keys. Make sure to also open traffic from AtriaWeb to AtriaSQL via SQL ports.
Enable WebSockets on Network Firewall/LoadBalancer
The Atria UI relies on WebSocket connections, and if firewalls or load balancers are not properly configured to support them, some pages within Atria may appear blank or fail to load.
The exact configuration required will vary depending on the firewall or load balancer in use.
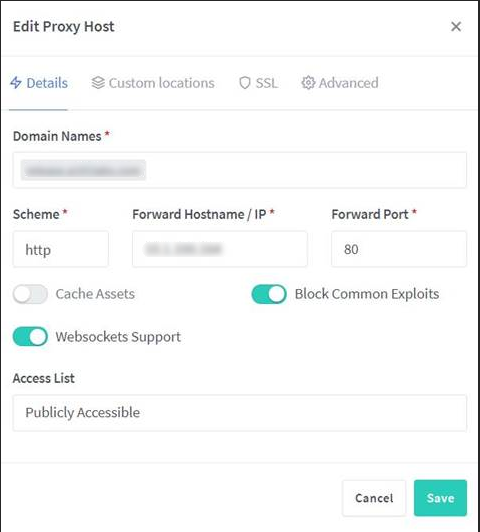
If using WebProxy to publish your Atria site, the configuration looks like this:
Access Token and Deployment ID
To access the Atria Installer platform, you’ll need a valid Access Token. To request one, please submit a support ticket to the Atria Support team via the Atria Help Center or by emailing support@getatria.com.
Along with the Access Token, you will receive a Deployment Identifier (DeploymentID) which is required during installation or during an upgrade to register your Atria deployment.
Summary
Before the installation of Atria, whether performed by your team or during a session with one of our engineers, please ensure all prerequisite steps have been completed.
Prerequisites Checklist
- Core Servers Setup and Domain Joined
- Necessary Firewall Rules Setup on Provisioning and Web Server
- WebSockets Enabled
- Active Directory Schema Extended
- Database Server Configured
- SQL Server and Recommend Tools Installed
- Mixed Mode Authentication Enabled
- TCP/IP Properties Enabled
- Windows-Authenticated User Access
- Key Vault Configured (If Applicable)
- PowerShell and .NET Framework Installed
- DNS Records Configured
- Domain Administrator Account Created
- Access Token and Deployment ID Available
The next step involves installing and configuring Erlang and RabbitMQ.
If you experience any issues or require any assistance with this process, please contact us at support@getatria.com.