Atria Installation
Overview
This guide provides clear step-by-step instructions to install the Atria Platform from scratch. The guide is structured in a way that allows you to work through each step individually. Please follow the guide carefully and reach out to us at support@getatria.com if you require any assistance.
Prerequisites
Ensure the required prerequisites are met before installation. Here is a checklist of the requirements:
- .NET Framework 4.8 - Installed on all servers
- PowerShell 5.1 - Installed on all servers
- Domain Membership - All servers are domain joined
- Extended AD Schema - Active Directory schema must be extended
- Erlang & RabbitMQ - Installed and configured
- DNS entry for RabbitMQ - (e.g.,
AtriaMessaging) - Necessary network ports open - On both Provisioning and Web server
- Accessible SQL Server - For database install
All of the above are covered in detail on our Atria Prerequisites page. Follow this link to learn more.
Installation Steps Overview
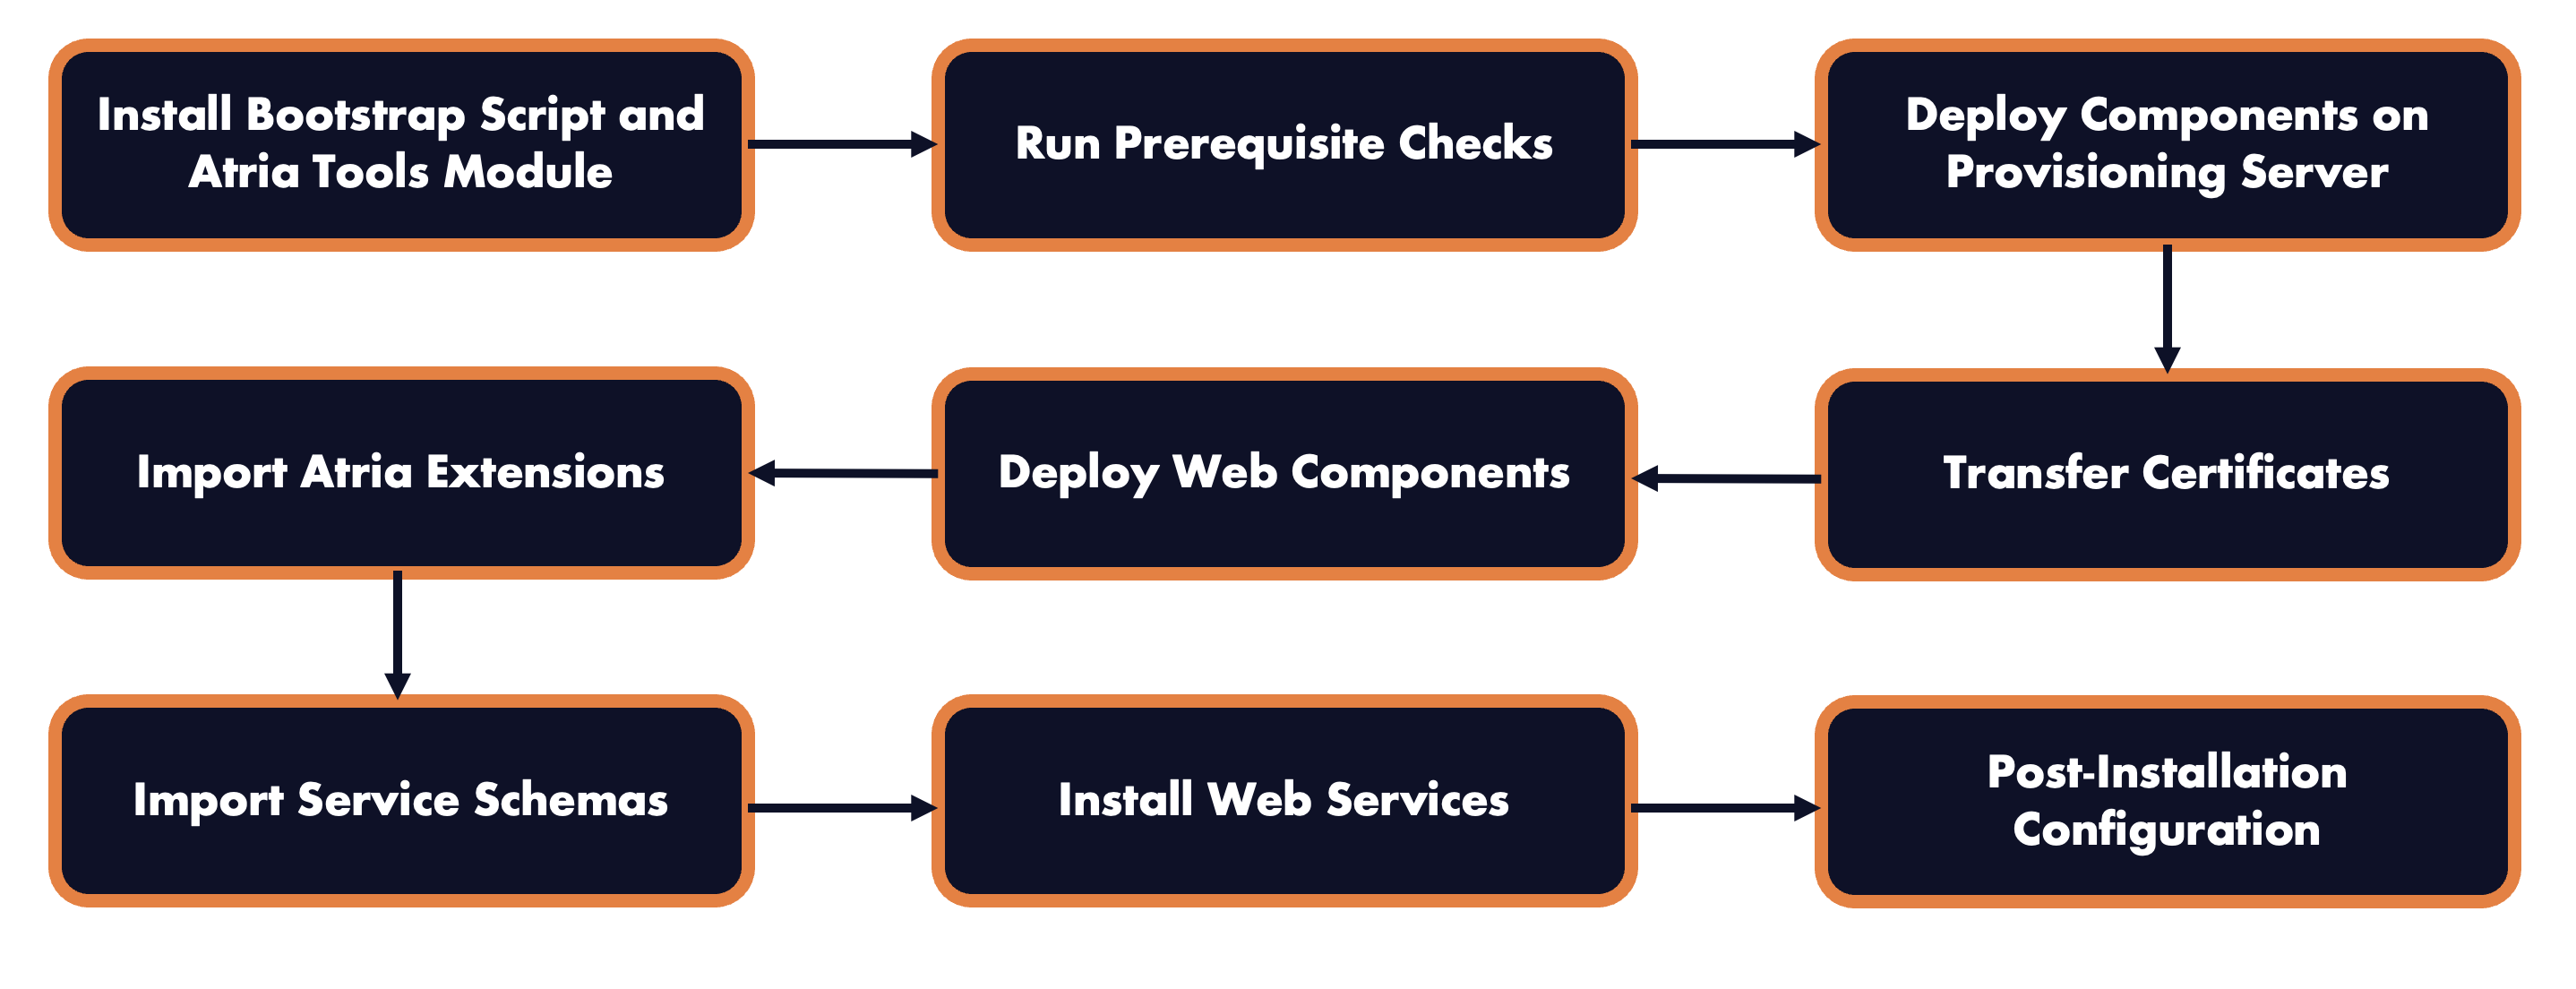
Step 1: Install Atria.Tools
For every PowerShell command given in this process, please run in an elevated (administrative) PowerShell window on the server given.
Run the following commands on both the Provisioning and Web server:
[Net.ServicePointManager]::SecurityProtocol = [Net.SecurityProtocolType]::Tls12
Install-Script Atria.Tools.Setup-Bootstrap
Atria.Tools.Setup-Bootstrap.ps1 `
    -username 'Company Name' `
    -PersonalAccessToken 'Access token provided by Atria'
-
For the
-usernameparameter, enter any name that represents your company. -
For the
-PersonalAccessTokenparameter, request this at support@getatria.com if you have not received this already.
Step 2: Test Prerequisites
Now that the Atria.Tools module is installed, we can check environment readiness. The below command will run all of the prerequisite checks or you can test the servers individually:
Test-AtriaPlatformInstallPrerequisites -AllServers `
    -DomainController '<ADServerName>' `
    -SqlServer '<SQLServerName>' -SqlServerPort '<SQLPort>' `
    -ProvisioningServer '<ProvisioningServerName>' `
    -WebServer '<WebServerName>' `
    -AtriaMessagingDnsAlias 'AtriaMessaging'
Individual Server Tests
Domain Controller
Test-AtriaPlatformInstallPrerequisites -DomainControllerOnly -DomainController '<ADServerName>'
Provisioning Server
Test-AtriaPlatformInstallPrerequisites -ProvisioningServer '<ProvisioningServerName>'
SQL Server
Test-AtriaPlatformInstallPrerequisites -SQLServerOnly -SqlServer '<SQLServerName>' -SqlServerPort '<SQLPort>'
Web Server
Test-AtriaPlatformInstallPrerequisites -WebServerOnly -WebServer '<WebServerName>'
PowerShell Result
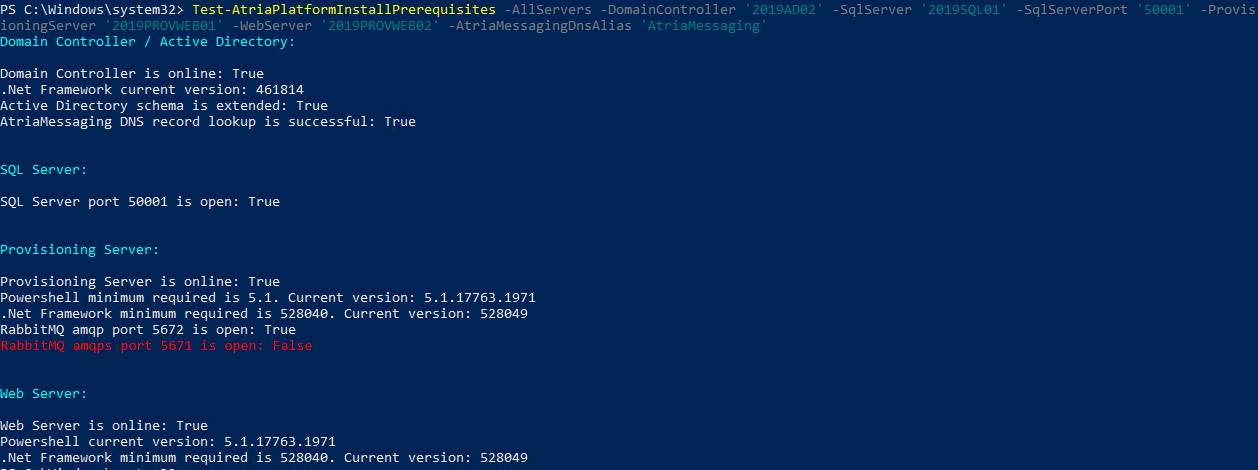
Domain Controller
- If remote PowerShell is disabled, the command will fail on the domain controller. If this happens, verify manually.
RabbitMQ
RabbitMQ will only be using one port, so one of the checks will fail.
- If SSL has been setup, the RabbitMQ port in use will be 5671.
- If SSL has not been setup, the port in use will be 5672.
To test these, you can use the following command:
Test-NetConnection -Computer (Provisioning Server) -port (5671/5672)
Step 3: Deploy Components on Provisioning Server
Install Config Service
This installer will create a database called AtriaConfigService on the database server specified, ensure this is added to your backup routines.
Run the following command using the Cmdlet parameters displayed below:
Install-AtriaConfigService `
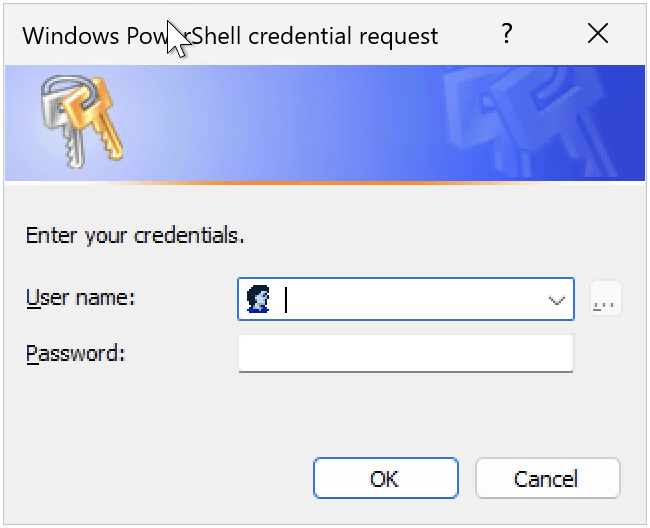
-Credential (Get-Credential) `
-StorageConnectionString 'Server=(SQL Server Name);Database=AtriaConfigService;Trusted_Connection=True' `
-MessagingUrl 'Your RabbitMQ Messaging URL' `
-MessagingUsername 'RabbitMQ Username' `
-MessagingPassword 'RabbitMQ Password' `
-UseSQLStore
ConfigService Cmdlet Parameters
-Credential
A domain administrator credential required to run the installers. You will be prompted for this when running the command:
-StorageConnectionString
The connection string for the database, including the server\instance and port.
- Replace
(SQL Server Name)with your SQL server name.
-MessagingUrl
The alias or URL for the RabbitMQ messaging service.
- The first part of the URL will either be amqps:// if you have configured RabbitMQ to use SSL or amqp:// if you haven't.
- the second part should be the FQDN for your RabbitMQ Management site (e.g. atriamessaging.domain.local).
- Finally, you need to add the port on the end. :5671 if you have configured RabbitMQ to use SSL or :5672 if not.
- Example URL:
amqps://atriamessaging.company.com:5671
-MessagingUsername
The username for the RabbitMQ admin account.
-MessagingPassword
The password for the RabbitMQ admin account.
-StorageType
Specifies the type of storage to be used. Options include:
-UseSQLStorefor SQL-based storage-UseFileSystemStorefor file system-based storage-UseKeyVaultStorefor Azure Key Vault-based storage
Example
Install-AtriaConfigService `
    -Credential (Get-Credential) `
    -StorageConnectionString 'Server=ABC-DB01;Database=AtriaConfigService;Trusted_Connection=True' `
    -MessagingUrl 'amqps://atriamessaging.company.com:5671' `
    -MessagingUsername 'rabbitmqadmin' `
    -MessagingPassword '0|X~>49#4V3WpXgV' `
    -UseSQLStore
Register Environment
Run the following command using the Cmdlet parameters displayed below:
Set-AtriaRegistrationDetails `
    -Environment 'Production' `
    -CRMId 'CRMID provided by Atria' `
    -Customer 'Customer Name'
Registration Cmdlet Parameters
-Environment
Choose Production
-CRMId
This will be provided by Atria. If you do not have this, you can contact us at support@getatria.com.
-Customer
Enter a name to describe your company.
Install Atria Database
- SQL Server Authentication
- Windows Authentication
Install-AtriaDatabase -ServerInstance '(SQL Server Name)' -ServerPort '1433' -SQLCredential (Get-Credential)
Database Cmdlet Parameters
Example
Install-AtriaDatabase -ServerInstance 'ABC-DB01' -ServerPort '1433' -SQLCredential (Get-Credential)
Install-AtriaDatabase -ServerInstance '(SQL Server Name)' -ServerPort '1433' -UseWindowsAuth
Database Cmdlet Parameters
Example
Install-AtriaDatabase -ServerInstance 'ABC-DB01' -ServerPort '1433' -UseWindowsAuth
When installing the database, it will generate your Service Provider Credentials. The username of this account will be created based upon the username of the user currently running the installation. You may change this later. Please make note of your new account details as they will be used to login to the Atria Platform once setup is complete:
![]()
Install Other Provisioning Server Components
Install-AtriaAgent
Install-AtriaPlatformApi
Install-AtriaProvisioning
Install-AtriaProvisioningManager
Install-AtriaDirectory
Step 5: Transfer Certificates
Before setting up the web server, you need to transfer the Atria Root CA certificate from the Provisioning server to the Web server.
flowchart LR
    A[Export Atria Root CA cert on Provisioning Server] --> B[Transfer cert to Web Server] --> C[Import Atria Root CA cert on Web Server]
You can refer to this guide to learn how to do this process.
Step 6: Deploy Components on Web Server
Now moving to the web server, ensure you have completed Step 1 before proceeding.
Run this command to install the Web Components:
Install-AtriaWebComponents
Alteratively you can install the components individually:
Install-AtriaWebForms
Install-AtriaProxy
Install-AtriaWeb
Install-AtriaExternalAPI
Step 7: Import Atria Extensions
Run the following command on the Provisioning Server:
Import-AtriaExtension -Extension @('AdUserSync','PowerShell','DatabaseMaintenance','SystemJob')
Step 8: Import Service Schemas
Run the following commands on the provisioning server and provide the Service Provider Credentials when prompted. These were given to you during the database install:
$atriacreds = Get-Credential
Set-AtriaServiceSchemaCredential -AtriaPortalCredential $atriacreds
Import the service schemas:
Import-AtriaServiceSchema -Service <ServiceName>
Available Services
We have many different services within our product. the ServiceName for each is described in the table below along with the service it relates to:
| Service Schema Name | Description |
|---|---|
| ADSync | Active Directory synchronization service |
| AzureAD | Azure Active Directory service |
| Citrix | Citrix service for virtual apps and desktops |
| CitrixDaaS | Citrix Desktop as a Service (DaaS) for cloud-hosted desktops |
| DNS | DNS Service for Windows DNS and BIND |
| Exchange | Microsoft Exchange On-Premise |
| FSS | File Sync Service |
| HostedAppsAndDesktops | Hosted applications and desktops service |
| MFA | Multi-Factor Authentication service |
| MicrosoftAdfs | Microsoft Active Directory Federation Services |
| MSOL | Microsoft Online Services |
| Sharefile | Citrix ShareFile service |
| Sharepoint | Microsoft SharePoint service |
| SkypeForBusiness | Skype for Business communication service |
| VirtualMachine | Virtual Machine management service |
| Workspace | Workspace services |
| WindowsWebHosting | Windows web hosting service |
If installing MSOL, you will need to install AzureAD first. If you are installing Citrix or Citrix Daas, you will need to install Workspace first.
You can import the service schemas all together, or one at a time:
Import-AtriaServiceSchema -Service ADSync,AzureAD,CitrixDaas,DNS,Exchange,MFA,Msol,VirtualMachine,Workspace,WindowsWebHosting
Step 9: Install Service Web Services
You need to install the Web Services for all of the Service Schemas you have imported.
For each service schema you have imported, run the related command:
| Atria Web Service | PowerShell Command | Server |
|---|---|---|
| Exchange | Install-AtriaExchange | Exchange Server |
| HostedAppsAndDesktops | Install-AtriaHostedAppsAndDesktops | Citrix Delivery Controller |
| MSOL | Install-AtriaMsol | Provisioning Server |
| Workspace | Install-AtriaWorkspace | Provisioning Server |
For services that aren't listed in the table, use the same naming scheme.
Step 10: Post-Installation Configuration
After successfully completing the installation, it is essential to validate that everything is functioning as expected. Begin by navigating to https://atriaweb/ to verify that the environment is accessible and the application is running smoothly.
Next, to ensure secure communication and proper access to the front-end website, you’ll need to configure SSL bindings in IIS. This can be done via the AtriaProxy site in IIS, where you will:
Add the appropriate hostname for the front-end website. Apply a valid SSL certificate to secure traffic between users and the server. These steps help to enhance security and ensure the application is accessible via HTTPS, providing users with a seamless and secure experience.
Once Atria has been successfully installed, you can move onto our Getting Started with Atria section to begin learning and using the platform.
If you experience any issues or require any assistance with this process, please contact us at support@getatria.com.