Import Users with the Bulk Import Feature
Overview
You can import new or edit existing users by using the Bulk User Import feature. This feature enables you to create new or modify existing users as specified in a Microsoft Excel Workbook (.xlsx). You can download a new blank template, or a workbook populated with existing user information from the portal. In either scenario, you perform the following actions:
- Create new or edit existing users.
- Select users to add or update.
- Provision services to the users and then provision the users.
After uploading the template, Atria gives you the opportunity to perform the following actions:
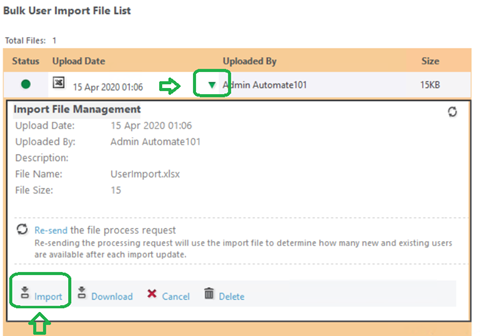
- Resend the file process request to upload the template again.
- Import the users from the template you uploaded.
- Download the template you uploaded.
- Cancel the bulk user import process.
- Delete the file from the imported file list.
Consider the following when you create or edit a Bulk User Import template:
- Do not rename the column headings in the templates.
- Do not leave blank rows between users.
- The templates do not support provisioning new services to users. You must provision services to users through the Atria by using the User Functions, Multi User Selection feature, or via the API.
Importing Users using the Bulk Import feature
- In the Atria Portal, navigate to
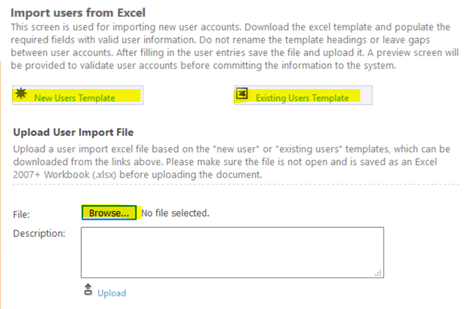
Customers > Customers, Select the desired Customer, Expand the collapsible Arrow > Users > Bulk Users Import, and choose either of the templates below:- New Users Template
- Existing Template
- Fill-in the user's information on the template and Upload
- You may Upload the either of the templates with file names below:
- CustomUserImport.xls
- UserImportFile.xls
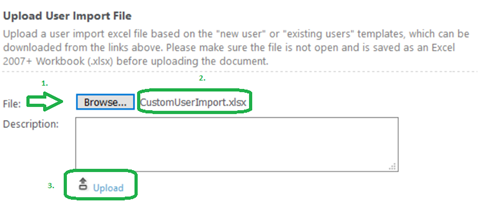
- Click Browse

-
In the pop-up Window > click Open > and locate the file in the File explorer window:

-
Click Upload and check under Bulk User Import File List if the uploaded file appeared. (Check the date and time).

-
Once the status is green, it means that the UserImport file / CustomUserImport file has been uploaded and imported successfully.
-
If the status is Red, review the uploaded template for invalid file formats, entries, fields, or column headings.
-
Click the Collapsible arrow under Bulk User Import File List and click Import.

-
The next window will display the list of users contained within the file and allow you select some or all of the users for import. Import the required users.
-
Validate the users have now been created:
- Go to
Customers > Customers > Select Customer > Expand the collapsible Arrow > Users.
- Go to
Bulk User Import Template Columns
The Bulk User Import Template workbook is a Microsoft Excel file that can be blank or contain information about one or more users in a customer hierarchy. It contains a header row that indicates all possible fields associated with a user.
| Column Heading | Detail |
|---|---|
| First Name | First name of the user |
| Surname | Surname or last name of the user |
| Display Name | First and last name of the user. If left blank, the Display Name is automatically created from the First Name and Surname fields. |
| UPN | User principal name in the format of username@domain.com. The domain is the customer's domain. A user can log on using the UPN. If you specify an email pattern such as %g.%s@domain, the resulting email address is in the form of firstname.lastname@domain. |
| Username | If blank, the software automatically creates a username for the user, using the UPN username appended with a _CustomerShortName. The _CustomerShortName is derived from the customer's ShortName. You can edit this field in the template or Edit User dialog. |
| Password | An alphanumeric user password. If blank for an existing user, the user's password is preserved. A password is required for a new user. Passwords must be at least eight characters long and contain at least three of the following four character types: Lower case alpha character Upper case alpha character Numeric character Symbol character, such as !, @, #, $, % |
| Location | The Active Directory location of the user's customer. Defaults to Unassigned if left blank. |
| Department | The user's assigned department. If blank, the default department is Unassigned. |
| Phone Number | Telephone number associated with the user |
| Custom Field | One or more fields for customized information associated with the user |
| Roles | Specify one or more comma-separated security roles for the user. For example: Customer Administrator, Exchange Service Administrator. Each column is limited to 250 characters. Use the Roles 2 through Roles 4 fields for additional roles. |
| Account Disabled | This field allows you to select one of the following from the drop-down: TRUE specifies that the user account is disabled and the user cannot log on to access services. FALSE specifies that the account is enabled upon import. |
| Change Password at Logon | This field allows you to select one of the following from the drop-down: TRUE specifies that the user must change its password when first logging on. FALSE specifies that the user does not need to change the user account password at first logon. |
| Password Never Expires | Select TRUE to set the user password to Never Expire. You must select TRUE if you want to use the AD Sync tool. Select FALSE to allow the user password to expire at regular intervals. |
| Email Addresses | Specify one or more email addresses for the user. If blank, the software automatically assigns an email address constructed from the UPN. |
| City/Zip/Postal/Title/Street | Specify physical address information for the user. You can specify a user's organizational title; for example, Manager of Engineering Services |
Below is a step-by-step tutorial on how to add a user with the bulk import feature: