RabbitMQ SSL Configuration
Overview
Configuring RabbitMQ with SSL ensures secure communication between services by encrypting data and preventing unauthorized access. This setup is strongly recommended for improved security but is not necessary to complete the installation of Atria. The guide slightly differs depending on whether you have already installed Atria or not. Please chose the relevant option when following the guide.
Prerequisites
- RabbitMQ
Ensure that RabbitMQ is setup and working correctly. You can check this by ensuring the RabbitMQ service is running, navigating to your RabbitMQ URL (e.g. http://atriamessaging.domain.local:15672), and logging in with the admin credentials you created.
- Certificate
Before configuring RabbitMQ with SSL, you must have an SSL certificate available for the URL you plan to use. This certificate can be purchased from a trusted certificate authority or generated using a certificate management tool.
- DNS Record
To ensure your chosen URL is reachable, you need to create a DNS A record. The hostname should start with atriamessaging and match the domain used in your SSL certificate (e.g. atriamessaging.(yourdomain).com). It must point to the IP address of your Provisioning Server. If external access is required, ensure the domain is publicly resolvable. For internal use, create the record in your internal DNS zone. Ensure you have a copy of your certificate available in the .pfx format on your Provisioning Server.
Process
- Before Atria Installation
- After Atria Installation
Certificates
Windows based certificates usually come in the .pfx format, however, RabbitMQ requires these to be in a .pem format, in this step we will convert the certificate to the correct format.
For this guide, we are using OpenSSL. This can be installed from this link: (https://slproweb.com/products/Win32OpenSSL.html)
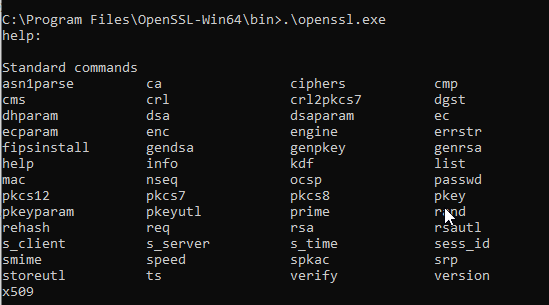
After this is installed, navigate to the path via Command Prompt that the openSSL was installed to (By default, this is 'C:\Program Files\OpenSSL-Win64\bin'). For example, I navigated to this path, and now I have the option to run commands against openssl.exe
Copy the .pfx certificate to a easy to access path (I'd recommend C:\Program FIles\OpenSSL-Win64\bin\Certs)
We can use OpenSSL to convert from .pfx to .pem and create a keyfile using the commands below:
.\openssl pkcs12 -in Certs\(Certificate Name).pfx -out Certs\cacertfile.pem
.\openssl rsa -in Certs\cacertfile.pem -out Certs\keyfile.pem

With these two files, (cacertfile.pem and keyfile.pem) you can now continue onto the next Configuration step
Create a file named RabbitMQ.conf in the RABBITMQ_BASE path that was set. (C:\AtriaRabbitMQ)
Add this content to the file to configure SSL:
listeners.ssl.default = 5671
ssl_options.cacertfile = \path\to\cacertfile.pem
ssl_options.certfile = \path\to\cacertfile.pem
ssl_options.keyfile = \path\to\keyfile.pem
ssl_options.verify = verify_none
ssl_options.fail_if_no_peer_cert = false
management.ssl.port = 15671
management.ssl.cacertfile = \path\to\cacertfile.pem
management.ssl.certfile = \path\to\cacertfile.pem
management.ssl.keyfile = \path\to\keyfile.pem
We recommend to use the RABBITMQ_BASE path for storing the SSL Certificates. A "Certs" folder can be created on the same location. (C:\AtriaRabbitMQ\Certs)
Otherwise, it can be a folder location where your certs are stored.
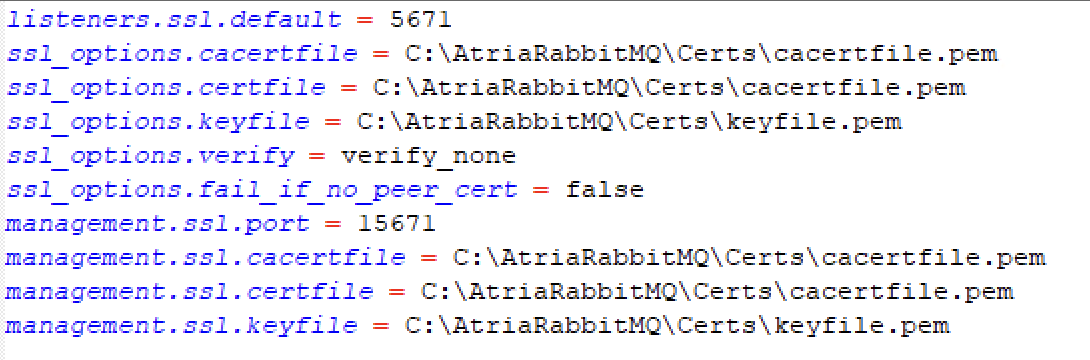
So, the full configuration file will look like the below with the relevant paths.
Re-installing RabbitMQ
- Stop the RabbitMQ service (Via Windows Services)
- Remove the RabbitMQ service using the tool in the start menu called RabbitMQ Service - remove.
- Re-install RabbitMQ service using the tool in the start menu called RabbitMQ Service - (re)Install.

The start menu shortcuts will only be available to the user who installed RabbitMQ. If you are using a different user account or don't see the start menu shortcuts, follow the attached steps.
- In PowerShell, navigate to the path of the server installation:
C:\Program Files\RabbitMQ Server\rabbitmq_server-version\sbin\
- Run the following commands in order:
.\rabbitmq-service.bat stop

.\rabbitmq-service.bat remove

.\rabbitmq-service.bat install

.\rabbitmq-service.bat start
You can then access the management environment on the server via https://localhost:15671/.
Certificates
Windows based certificates usually come in the .pfx format, however, RabbitMQ requires these to be in a .pem format, in this step we will convert the certificate to the correct format.
For this guide, we are using OpenSSL. This can be installed from this link: (https://slproweb.com/products/Win32OpenSSL.html)
After this is installed, navigate to the path via Command Prompt that the openSSL was installed to (By default, this is 'C:\Program Files\OpenSSL-Win64\bin'). For example, I navigated to this path, and now I have the option to run commands against openssl.exe
Copy the .pfx certificate to a easy to access path (I'd recommend C:\Program FIles\OpenSSL-Win64\bin\Certs)
We can use OpenSSL to convert from .pfx to .pem and create a keyfile using the commands below:
.\openssl pkcs12 -in Certs\(Certificate Name).pfx -out Certs\cacertfile.pem
.\openssl rsa -in Certs\cacertfile.pem -out Certs\keyfile.pem
With these two files, (cacertfile.pem and keyfile.pem) you can now continue onto the next Configuration step
Create a file named RabbitMQ.conf in the RABBITMQ_BASE path that was set. (C:\AtriaRabbitMQ)
Add this content to the file to configure SSL:
listeners.ssl.default = 5671
ssl_options.cacertfile = \path\to\cacertfile.pem
ssl_options.certfile = \path\to\cacertfile.pem
ssl_options.keyfile = \path\to\keyfile.pem
ssl_options.verify = verify_none
ssl_options.fail_if_no_peer_cert = false
management.ssl.port = 15671
management.ssl.cacertfile = \path\to\cacertfile.pem
management.ssl.certfile = \path\to\cacertfile.pem
management.ssl.keyfile = \path\to\keyfile.pem
We recommend to use the RABBITMQ_BASE path for storing the SSL Certificates. A "Certs" folder can be created on the same location. (C:\AtriaRabbitMQ\Certs)
Otherwise, it can be a folder location where your certs are stored.
So, the full configuration file will look like the below with the relevant paths.
App Settings Messaging URL:
At this point in the process, the messaging URL within the config service files needs to be updated to use SSL. Use the following guide to implement this:
Please follow the steps very carefully as messing them up can lead to issues with your Atria environment. Contact us at support@getatria.com if you require assistance.
Updating the App Settings Messaging URL within the Config Service
-
Open an administrative PowerShell session on your Provisioning Server.
-
Run the following commands to load the components required:
Import-Module Atria.Tools
Import-Module Atria.Platform
- Navigate to the location of the Config Service:
cd 'C:\Program Files\Automate101\Atria\ConfigService'
- Run the following script to decrypt the Config Service secrets:
$encUtil = New-Object -TypeName 'Atria.Common.Utils.SymmetricEncryptionUtil'
$ConfigDecryptor = New-Object -TypeName 'Atria.Common.Configuration.ConfigurationEncryptor' -ArgumentList $encUtil
$configJson = ConvertFrom-Json ((Get-Content .\appsettings.secrets.json)-Join "")
$configDict = New-Object 'System.Collections.Generic.Dictionary[String,String]'
$configJson.PSobject.Properties | %{$configDict.Add($_.Name, $_.Value)}
$ConfigDecryptor.DecryptConfig($configDict)
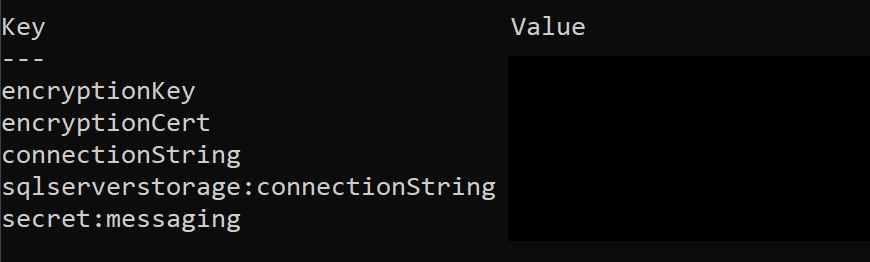
This should return the following with values for each of the keys:
We are now going to edit the value for secret:messaging.
- Run the following commands to isolate
secret:messaging:
$message = $ConfigDecryptor.DecryptConfig($configDict)
$message['secret:messaging']
This should return the following:
{"userName":"(Your RabbitMQ Username)","transport":"RabbitMq","url":"amqp://atriamessaging","password":"(Your RabbitMQ Password)"}
- Copy this string into a text document so we can manipulate it:
- Ensure the RabbitMQ Username and Password are correct
- Edit the URL with the following changes:
- Change amqp to amqps.
- Add the domain portion of your RabbitMQ management URL after atriamessaging.
For example, if your URL for RabbitMQ Management is http://atriamessaging.company.com:15671/, you should change the URL in your string to be amqps://atriamessaging.company.com.
- Back in your PowerShell window, set a new variable called $messagenew to your edited string.
For Example:
$messagenew = '{"userName":"(Your RabbitMQ Username)","transport":"RabbitMq","url":"amqps://atriamessaging.company.com","password":"(Your RabbitMQ Password)"}'
- Encrypt and place the correct value back into the App Settings using the following command:
Set-AtriaAppSettingsSecret -SecretKey 'secret:messaging' -SecretValue $messagenew -AppSettingsFile 'C:\Program Files\Automate101\Atria\ConfigService\appsettings.Secrets.json' -ComponentName messaging
- Run the following script again to check that your changes have been made:
$encUtil = New-Object -TypeName 'Atria.Common.Utils.SymmetricEncryptionUtil'
$ConfigDecryptor = New-Object -TypeName 'Atria.Common.Configuration.ConfigurationEncryptor' -ArgumentList $encUtil
$configJson = ConvertFrom-Json ((Get-Content .\appsettings.secrets.json)-Join "")
$configDict = New-Object 'System.Collections.Generic.Dictionary[String,String]'
$configJson.PSobject.Properties | %{$configDict.Add($_.Name, $_.Value)}
$ConfigDecryptor.DecryptConfig($configDict)
You will need to run the full script again to see any changes. Running just the final line will give you the results before your changes.
After this is complete, you can move onto the next step.
Re-installing RabbitMQ
- Stop the RabbitMQ service (Via Windows Services)
- Remove the RabbitMQ service using the tool in the start menu called RabbitMQ Service - remove.
- Re-install RabbitMQ service using the tool in the start menu called RabbitMQ Service - (re)Install.
- In Windows Services, restart the following services in order:
- Atria Config Service
- Atria Agent
- Atria PlatformAPI Service
- Atria Provisioning Service
The start menu shortcuts will only be available to the user who installed RabbitMQ. If you are using a different user account or don't see the start menu shortcuts, follow the attached steps.
- In PowerShell, navigate to the path of the server installation:
C:\Program Files\RabbitMQ Server\rabbitmq_server-version\sbin\
- Run the following commands in order:
.\rabbitmq-service.bat stop

.\rabbitmq-service.bat remove

.\rabbitmq-service.bat install

.\rabbitmq-service.bat start
- In Windows Services, restart the following services in order:
- RabbitMQ
- Atria Config Service
- Atria Agent
- Atria PlatformAPI Service
- Atria Provisioning Service
You can then access the management environment on the server via https://localhost:15671/.
Summary
Now RabbitMQ is setup to use SSL for secure communications, you can move onto installing Atria.
FAQ
Does the RabbitMQ SSL certificate need to be trusted not only at the primary location but also across all remote ADs?
Yes, the SSL certificate for RabbitMQ should be trusted on all remote ADs. You need to add the aliases to the certificate SAN Example:
Internal FQDN: atriamessaging.internal.local
Public FQDN: atriamessaging.company.com
Server FQDN: prov01.internal.local
The copy of the internal RootCA will be applied on the remote ADs (if self-signed), otherwise if this is a known certificate signer (verisign, etc) The FQDN should be resolvable on the DNS of the remote AD.