Managing Security Roles
Overview
Security roles in Atria define the permissions and access levels for users within the platform. By assigning users to specific roles, administrators can control which features, services and resources each user can access.
For example, the first or default user created for a customer is a customer administrator.
- The customer administrator is automatically assigned the Customer Administrator security role (and can also be assigned other security roles).
- The customer administrator can then assign one or more security roles to users in the customer hierarchy.
A security role can also consist of multiple security roles; for example, the My Account and Services Management role consists of the My Account Management and My Services Management roles.
Atria includes a default set of security roles
A service provider can manage security roles associated with:
- Customers
- Services
- User Services
- Users
- Menus
- Configurations
- Pages
- Reports
Customers additionally contain further permissions that pertain to the global changes across the system. For example, ability to view the Customer Dashboard, or manage the Jobs functionality.
Default Security Roles
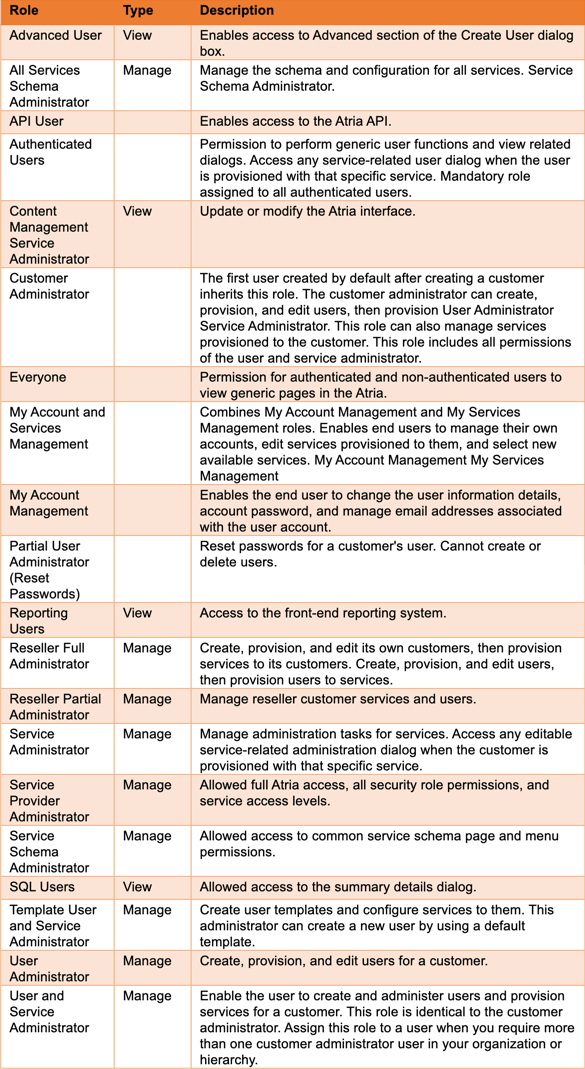
Atria includes a default set of security roles. The default roles cannot be deleted or modified but can be copied and used as a template for a new role. A role can consist of one or more roles. In the case of a role consisting of multiple roles, the role inherits the permission levels of the component roles.
Security Roles Installed by Default

Custom Roles
User-defined roles tailored to specific organizational needs.
Create or copy security roles: default roles cannot be deleted or modified but can be copied and used as a template for a new role. You can also create a completely new role through the New Role dialog box.
To create a new security role: When you create a new security role, the Role Setup section is blank and the Role Permissions access settings are set to a default value of None and all Menus, Pages, and Reports selections are cleared.
- From the Atria menu bar, select
Configuration > Security > Security Roles. - Click New Role. A new Role Management dialog box is displayed.
- Complete the fields and selections in the Role Setup section and modify the Role Permissions section as required, then click Save.
To copy an existing security role: When you create a new security role, the Role Setup section is blank and the Role Permissions area contains the access settings of the copied security role.
- Select Configuration > Security > Security Roles to display the list of security roles.
- Click a role from the list to expand the role properties.
- Click Copy at the bottom of the Role Management dialog box. A new Role Management dialog box is displayed.
- Complete the fields and selections in the Role Setup section and modify the Role Permissions section as required, then click Save.
Role Setup
The Role Setup section of the Role Management dialog box enables you to specify the service to which the role is applied, any associated role groups (such as Exchange Users), administrator type, and other settings and information.
Name: Provide a descriptive name for the security role, using alphanumeric characters, including spaces.
Directory Name: Specify the name of an Active Directory security group to associate with the security role.
- Leave this value blank if you do not want to create a group.
- Specify the name in the form of a pattern.
- For example, specify
"HE {CustomerShortName} USERS"for Hosted Exchange Users of a particular customer.
- For example, specify
Description: Optionally describe the new security role.
Filter on Service: Select an existing service from the drop-down list.
- If a service filter is selected and the customer has been provisioned with that service, the security role is available in the user or customer Account Settings dialog box.
- Selecting this option enables the Service Filter Scope setting.
Service Filter Scope: This setting is enabled if you selected a service from the Filter on Service drop-down list.
- Select Customer to make the security role available if the customer is provisioned with the service.
- For example, an administrator can view service administration dialog boxes when the service is provisioned to a customer.
- Select User to activate the role to users provisioned with the associated service.
Mandatory: Select Enabled to automatically assign the security role to all users.
- The security role is not displayed on the user Account Settings dialog box.
- Clear Enabled to make the security role selectable on the user Account Settings dialog box.
Hidden: Select Enabled to hide the security role; that is, the security role is not visible to users other than the service administrator.
- Use this option until the security role is ready to be applied to users or customers.
- Clear Enabled to make the security role visible in the Atria.
Role Groups
Attach existing security roles to the new or edited security role. When assigned, the user or customer inherits the permissions of the new or edited security role and the selected security roles.
Administration Role: Select Enabled to include this security role as common role to all users. The security role is displayed on the user Account Settings dialog box.
- Select Clear to make this security role available to users through the Configure a custom role collection option displayed on the user Account Settings dialog box.
User role type: Select one of the following user role types. A related icon will appear next to the user when the security role is assigned:
- None
- Service Administrator User Administrator
- User and Service Administrator
Available to all customers: Select Enabled to make the security role available to all customers.
- The role can be assigned to any user unless explicitly denied to a customer when creating or editing the customer properties.
- Clear Enabled to enable you to explicitly assign the role to a customer or reseller customer (which can then be assigned to a user) from the Allowed Roles list available from the customer's Advanced Properties
Role Permissions: Customers, Services, User Services, Users
This topic describes the settings used for defining a security role's access to customers, services and users in the control panel. These settings appear in the Role Permissions section of the Role Management screen.
- To access the Role Management screen,
select Configuration > Security > Security Rolesand then create or select the security role you want to configure. - On the Customer, Services, User Services, and Users tabs, you can expand certain permissions and apply more detailed permissions.
- For example, on the Customers tab, you can expand the Read permission and select additional permissions such as Name, Contact Detail, and Billing Identifier.
- On the Services and User Services tabs only, you can use the Filter drop-down list to apply selected permissions to a specific service or to all services in your deployment.
- You set permissions for each function by clicking the Access selector next to the function. The Access selector changes to denote one of the following permission levels:
Below is the key of the Permissions selection

None selected: No access to the function.
Customer: The function is permitted for the selected customer.
- For example, the User Services permissions of Read, Update, and Provision for the My Services Management security role are set as Customer.
- This setting indicates that the administrator user with the My Services Management role can perform that function on its customer only.
Sub Customer: The function is permitted for the sub-customer of the selected customer.
- For example, if the User Services permissions of Read, Update, and Provision for a security role are set as Sub Customer, users with this role can perform the function on the customer's sub-customer (but not on the customer).
Customer and Sub Customer: The function is permitted for the selected customer and related sub-customer(s).
- For example, if the User Services permissions of Read, Update, and Provision for a security role are set to Customer and Sub Customer, users with this role can perform the function on the customer and its sub-customer(s).
After you finish modifying the security role, click Save.
Role Permissions: Menus, Pages, Reports
This topic describes the settings used for defining a security role's access to menus, pages, and reports in the control panel. These settings appear in the Role Permissions section of the Role Management screen.
- To access the Role Management screen,
select Configuration > Security > Security Rolesand then create or select the security role you want to configure. - To permit a security role to access specific menus, pages, or reports, you select the appropriate check box.
- To deny access, clear the appropriate check box.
When granting access to submenus, you must also enable access to all parent menus. If you do not enable access to the parent menus, the submenu item is not visible to applicable users when they are logged on to the control panel.
- For example, if you enable access to the Customer Brand submenu item, but do not enable access to Customers, Configuration and Branding - the Customer Brand menu item does not appear in the menu bar to applicable users.
- After you have finished modifying the security role, click Save.
Export and Import Security Roles
Before you import or export a role, consider the following:
- You cannot import a security role that already exists in the control panel.
- Make any changes to security roles through the control panel, not by editing the XML file created, by exporting a security role.
- Importing an edited security role XML file causes the import operation to fail.
- Atria enables you to import and export roles between Atria environments.
- For example, you can design and test security roles in a test or staging environment, then import the roles into one or more of your production environments through an XML formatted file.
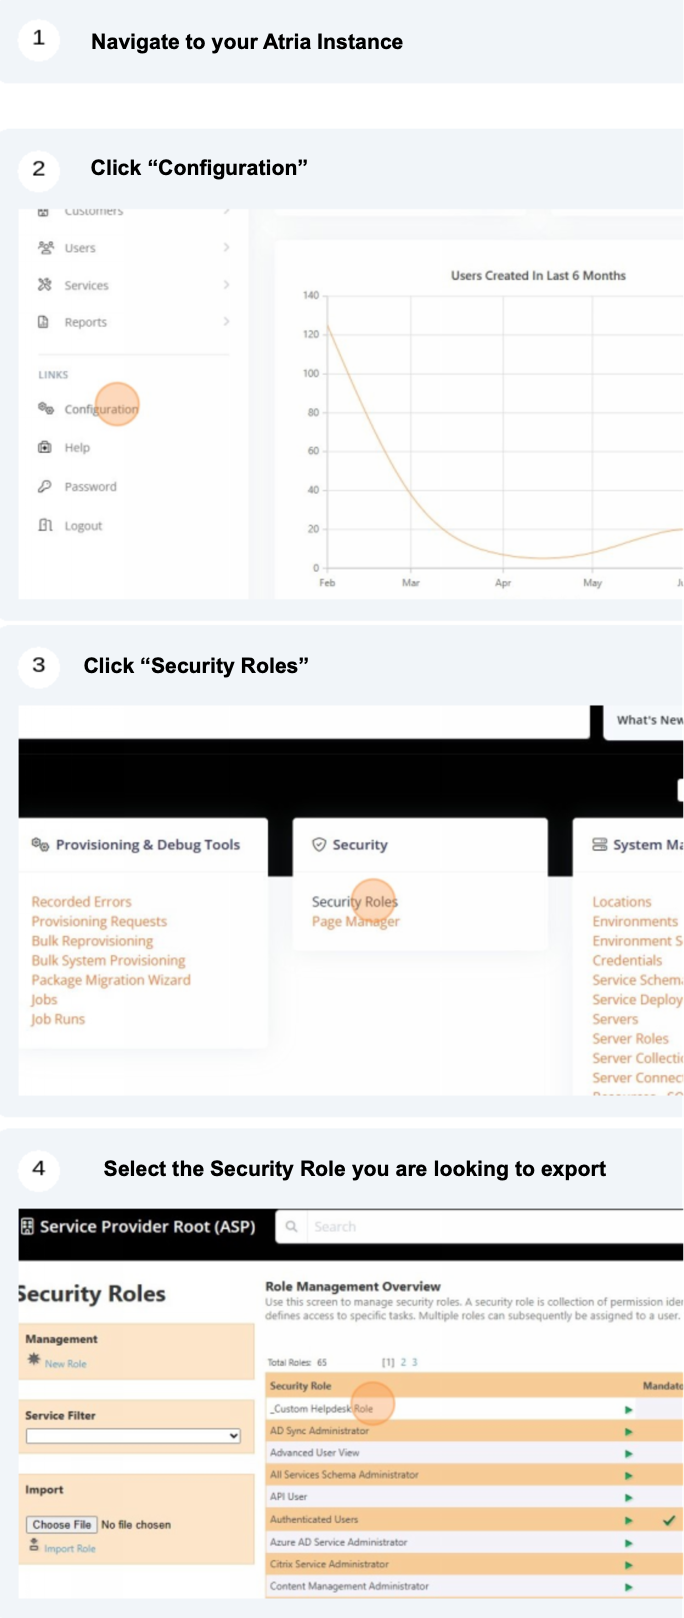
To Export a Security Role
Security Role Export Guide

To Import a Security Role
Security Role Export Guide

The security role is imported, as indicated by the message Role import completed. If any errors occur, try exporting the role, then import it again.