Microsoft Online Service Provisioning
Overview
This page contains a guide to configuring and provisioning the Microsoft Online Service within Atria.
Before you Start
Ensure the Microsoft Online service has been deployed, a PartnerCenter connection has been established, and at least 1 customer and user plan have been created.
Provision the Azure AD and Microsoft Online Service at Service Provider Level
- From the Atria Menu, choose Customers.
- On the list of customers, expand the Service Provider and then click Services.
- Expand Reseller and then tick Azure AD.
- Enable your Customer Plans and then click Apply Changes.
- Provision the Reseller service
- Expand Reseller and then tick Microsoft Online.
- Enable your User Plans and then click Apply Changes.
- Provision the Reseller service
- Verify that both services have been provisioned:
Service Provider Provisioning
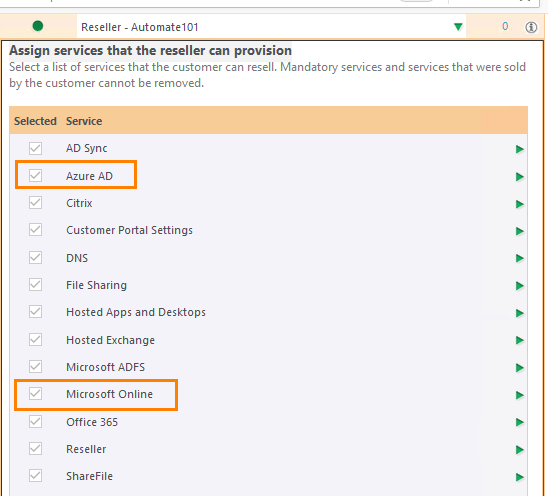
After provisioning on the service provider level, the services will be available to Customers.
Provision the Azure AD and Microsoft Online Service at Customer Level
Atria provides the ability to create new Azure AD tenants, or connect to existing ones. If creating a new tenant, we recommend to do this in your Partner Center as you will need to navigate here to accept GDAP terms anyway. Further information on GDAP can be found here: How does GDAP apply to Atria?
To proceed with provisioning the Microsoft Online Service, you will need to ensure that the Customer has signed their Microsoft Customer Agreement within their Microsoft PartnerCenter. Subscriptions cannot be created until the agreement has been signed and a record of the agreement being signed has been made within PartnerCenter. The agreement can be recorded in PartnerCenter from within the Azure AD Service. If it has already been signed by the customer, the agreement will be retrieved and shown.
Connecting to an Azure AD Tenant
- Navigate to your desired Customer
- Expand the Azure AD service:
- The Azure AD service in Atria is used to connect an existing Atria Customer with an Azure AD tenant. The connection process allows the user to execute a real-time search via PartnerCenter to locate the tenant.
- Select your Customer Plan
- Search for and select your Azure AD tenant. If your customer plan is a direct connection, then the customer should already be connected when you Connected a Customer to Microsoft Directly
Azure AD Tenant
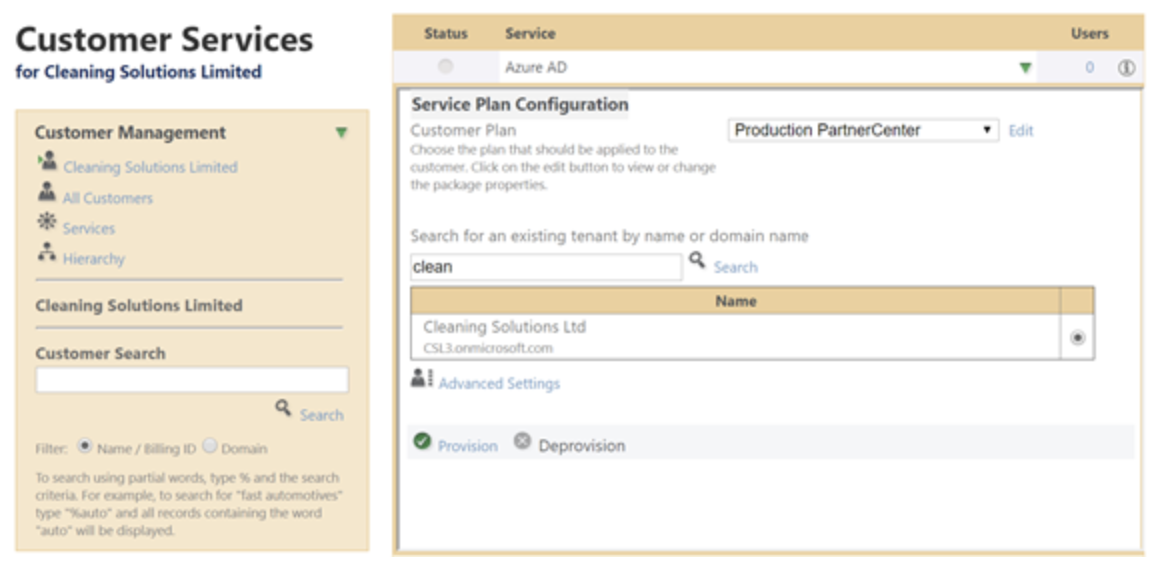
- Select Provision to connect the Azure AD tenant to the Atria Customer.
After clicking the Provision button, there may be a slight delay before the provisioning request is initiated while Atria establishes a connection with your Azure AD tenant.
Enabling the Customer to Consume Microsoft Services
Once the Azure AD service has been provisioned to the customer, the Microsoft Online service can then be used to manage the User Plans available for user provisioning.
-
Navigate to your desired Customer
-
Expand the Microsoft Online Service
- This will run a realtime query against Microsoft PartnerCenter to retrieve all the licenses associated with the tenant.
-
Expand the “Advanced Settings” to expose the different plans
-
Enable the plans that you want to available for provisioning within this customer.
User Limit
Note that you can set a hard limit on the plans if needed, this will restrict the quantity of users that the customer can provision themselves.
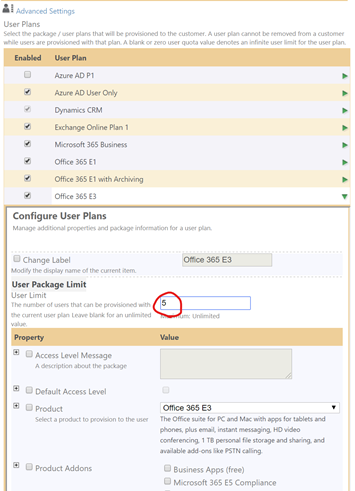
- Click Provision to provision the Microsoft Online service to the customer.
Once an Atria Customer has been “connected” to an Azure AD tenant, the sync function within Atria will retrieve all users and licenses from Azure AD and synchronize these with Atria. This function executes using configuration defined within the Sync Policy. For more details on the Sync Function please review the following article: Synchronizing Atria with Microsoft Online
Provisioning Users with Microsoft Services
Once the tenant has been set up, provisioning users is simple.
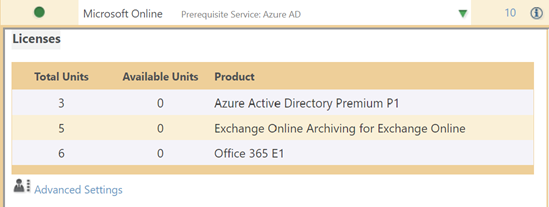
For Indirect providers, you will not be able to provision users with licenses unless there are licenses available within the tenant that are free for allocation. This can be checked within the Microsoft Online service at Customer Level:
User Provisioning Process
- From the Atria Menu, choose Customers then click on Users
- Expand the User and click on Services
- Expand Microsoft Online, select the User Plan and Provision
- Take note of the temporary password, this will be the one to be used by the user on logging in
Provision
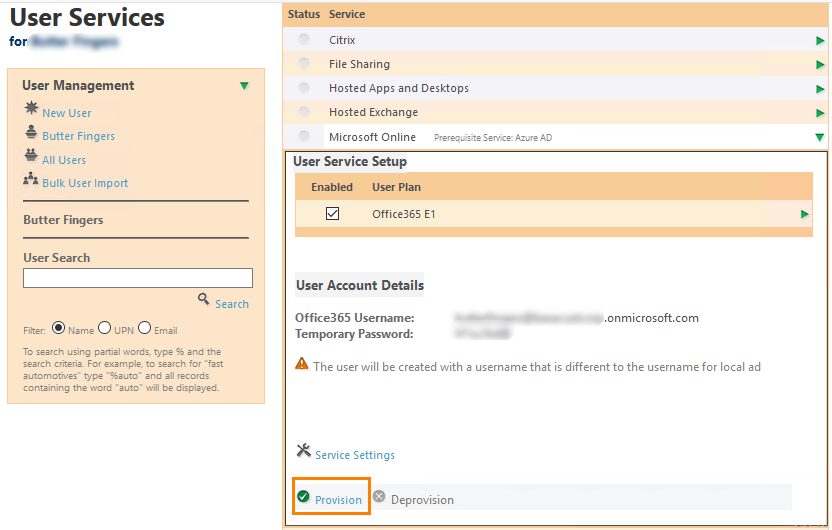
When the Microsoft Online user service is provisioned, Atria will check Azure AD for any existing user that matches the user’s User Principal Name (UPN). If a match is found, the existing Azure AD user will be linked to the corresponding Atria user.
If no matching user exists, Atria will create a new user in Azure AD. If the domain specified in the user’s UPN is active in Azure AD, a corresponding UPN will be generated. If the domain is inactive, the system will default to using the onmicrosoft.com domain to create the user’s Username.
It may be easier to get your domains configured in Azure AD before you start provisioning users, if you add domains to Azure later, then on re-provisioning of users, their UPNs will get changed to match the UPN configured against the user in Atria.
Scenario
- User Ella with UPN of ella@unicorns.com.
- Unicorns.com not validated within the Azure AD tenant.
- Onmicrosoft.com domain of unicorns.onmicrosoft.com is created.
- UPN will be generated of ella@unicorns.onmicrosoft.com.
Passwords
When users are provisioned in Azure, a new password is generated. This will be displayed prior to provisioning. You can also configure Atria notifications to email the password.
After assigning a user a service plan that includes Exchange Online, there is often a brief delay before mailbox services are fully provisioned. Even though Microsoft and Atria may indicate that the license assignment is complete, this does not guarantee the mailbox is ready for use. This initial setup period can be longer when Exchange Online is being configured for the first time (i.e., when the first user is given a subscription).
During this period, provisioning requests might fail, such as attempts to add email aliases to a user. While the setup can sometimes be quick, it may also take several hours. Our processes have been optimized based on testing, but further adjustments may be needed over time.